Did you read last Friday’s post, in first in my “My Best” series? I wrote about my best parenting hacks, and the feedback was great – thanks! I loved your hacks, too.
Today’s theme is art. We are big on art around here. Art is beautiful, yes, and fun to make. It’s relaxing (no wonder adult coloring books exist!) and addictive. Additionally, art allows us to build essential life skills (are they not?!):
- tracing
- cutting paper
- using glue sticks and Elmer’s glue
- composition
- patterns
- color mixing (and therefore the color wheel and rainbow order)
I try to have my girls (mostly Squish, as Puff is just a bit too young to do some things, although we’ve started letting her play with play-doh – and paint will be soon) do some art every day, unless Squish really doesn’t want to. Even five minutes of some free-form drawing is good in my book.
We have a lot of fun in our house playing with all sorts of materials: paints, pom-poms, fabric, pipe cleaners, foam/floam/slime, and even objects found around the house (hello, wagon wheel pasta!). Personally, I love doing all sorts of art and crafts, and I try to instill that love in my kids now; hopefully they’ll absorb it. Six months ago I finished an oil painting they saw transform from blank canvas to completed miracle (in my book), I sew occasionally, I doodle, and I make crafts for them to play with. I love helping with their crafts, too!
I get ideas from many sources: what I remember doing as a child, what my mom friends post on Facebook, other mommy blogs, and occasionally Pinterest. I hope you will find some great ideas from this post to do with your kids, too!
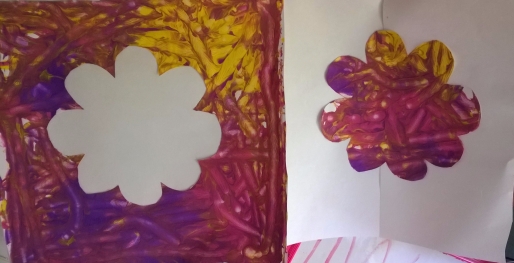
- Marble painting. Yes, this is kind of all over the internet. But we had a lot of fun with this! We made positive/negative images by cutting out a letter or a shape (before or after painting); I love how they look side by side. Just put a few blobs of 3-4 colors of paint on paper taped inside a baking tin (or closed leftover container – which I did for Puff). Toss in a marble and let them tip the container side to side until it’s covered to their liking.

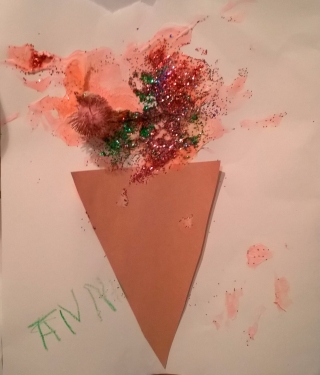
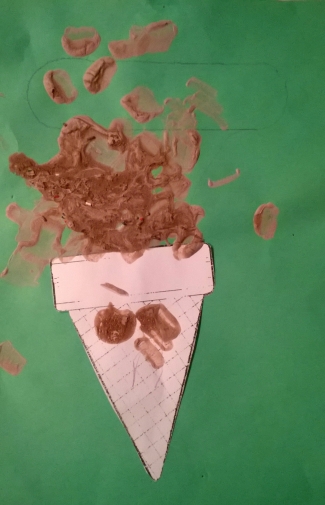
- Shaving cream puffy paint (optional essential oils). We first did this at our library for “i” letter story time – the “chocolate” ice cream cone. You just mix tempra or washable paint, some white glue, and shaving cream, then dot on with a brush! Add oils if you desire (the effect is short-lived!), such as mint. Squish made the pink ice cream cone at a party and got to add glitter “sprinkles” and a pom-pom “cherry.” She had a blast!!
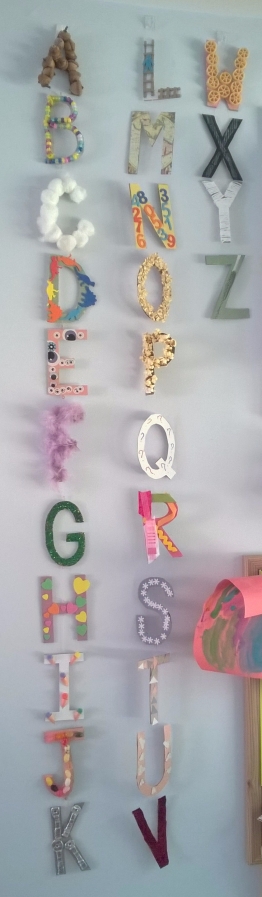
- Letter series. I know I’ve posted a photo of this craft before, but I just really, really love it! We had so much fun doing this. Every week for a new letter we’d make a new letter to hang up. Acorns for A, beads for B, cotton for C … all the way down to yarn for Y and a zipper for Z. She perfected tracing (cardboard onto a construction paper cover), careful gluing, paper cutting, and arranging doing this craft – not to mention her letter shapes and letter sounds!
- Pasta collage. Do you remember making one of these when you were younger? Me too!! Guess what? It’s still fun!!! Grab some star-shaped pastina (if you dare), wagon wheels, and rotini to give your kid the supplies to let their creativity run wild! I can’t for the life of me find the photo I took of Squish’s pasta castle … so let’s hope your kids’ creations are even more spectacular!
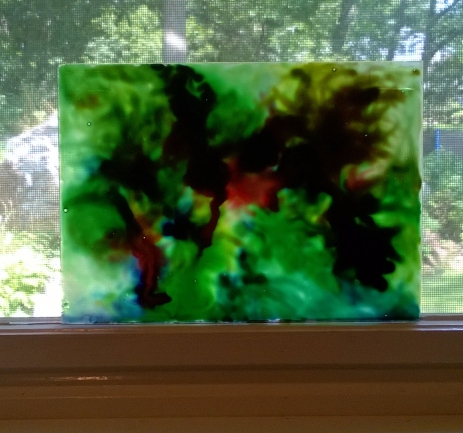
- Stained glass painting. The Arty Mommy posted this beautiful idea to make a “nebula” stained glass painting, and we loved it!! Hers came out more like a nebula than ours did, but I still like Squish’s. We had so much fun seeing the wet painting with distinct color lines dry and blur into the truly nebulous end result. Right now it’s taped to our kitchen window and lets in fabulous light. I felt like we have a LC Tiffany piece!
- Felt matching craft and changeable scenes. Thank you to Rosebudquilts for this excellent idea! After I created the shape matching activity using colored felt (which I attach to a clipboard for stability), I cut out backgrounds and items for a forest scene and underwater scene. My kids can rearrange this to their hearts’ content. I love to see what their brains can create from what I originally made for them!


- Creative creatures. I wrote recently about teaching STEM classes at our local library. One activity was creative freeform creatures with a basis of what we learned – how creatures are classified and named based on how many features they have (uni-, bi-, octo-, hexa-, tri-). I was amazed how conventional almost all the kids made their creatures – they were almost portraits – so I let Squish and I try for ourselves the next day. We gave ourselves freedom to make any creature our imagination could create, and I love the results! The goal is to just make a unique creature and name it according to its features. Love it!

Squish’s creature – a “Hairy Hooligan”!!

My creature – a uni-horned hexapillar (there is a horn coming out of it’s yellow diamond nose).
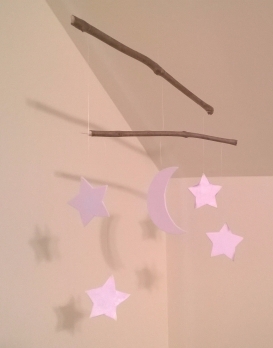
- Glow-in-the-dark mobile. I got this idea from Squish’s High Five magazine (we love the craft idea at the end of each issue!). Simply coat (thickly) glow-in-the-dark paint on white foam stars and a crescent moon (or planets or whatever else you want!), then string up using fishing line and horizontal poles. We used sticks. She loves the soft glow it gives every night when she turns out her light.
- Converted shirts – into dresses! I recently cleaned out my closet and found a few small shirts I just couldn’t wear post-baby. A few Squish said she loved … so I converted one into a dress for her! It used to be a pretty silk halter shirt, but I just sewed the halter straps into a criss-cross back and put in some side pleats to make it fit tighter to her. Voila! Homemade dress in an hour. (She does have to wear shorts underneath….) I mean … fashion is art, right?


There’s my list of best arts and crafts projects! What’s atop your list? Any great crafts you’ve found lately?

Your felt things are way better than mine! I still only have the shapes and his name. Whomp whomp! I need to get back to it, they are super fun! Great ideas. We definitely need to do more crafts around here. (Though I won’t be using that teeny tiny star pasta anytime soon! That’s just a disaster waiting to happen.)
LikeLiked by 1 person
Thanks! I had fun doing the scenes … right after the kids laid down to sleep I worked on them for a few days about 20 minutes upstairs before going back downstairs.
Pastina IS kind of hell … but my daughter liked the stars for her “sky,” so….
Thank you for the idea!!
LikeLiked by 1 person
Great post! I love a bit of crafting and you have some great little projects there. I think I might have to give the changeable felt scenes a try xx
LikeLiked by 1 person
Glad you liked it! We enjoyed them all. I hope your boy has a good time with the scenes as well!
LikeLike
Cute projects!
Haha, I still think back fondly on pasta art! 😀
LikeLiked by 1 person
It half felt lame and half felt very creative…
LikeLike
love these! I really like the matching felt!
LikeLiked by 1 person
Thanks!! We like that, too!
LikeLiked by 1 person
cute projects! I totally forgot about the marble idea…going to try it!
LikeLiked by 1 person
It’s so fun! The kids loved shaking/tilting the container so much, though I did help them to get full coverage.
LikeLike
I love the letter project! Most of the art I did with the kids this summer came from Arty Mommy. One day during the summer, I filled some cheap water guns with dyed water and let them spray it on a blank canvas. They loved that one!
LikeLiked by 1 person
I get a lot of ideas from her, too!!! I have a list of “to-do” projects, and most of them are from her. 🙂
I LOVE that water gun idea!!!!!!!!!!
LikeLiked by 1 person
Pingback: “My Best” Series: Best Sticker Uses (That Don’t Cover The Walls!) | welcometothenursery
Pingback: “My Best” Series: The Kids’ Top 12 Favorite Books, EVER | welcometothenursery
Great post with lovely ideas!
LikeLiked by 1 person
Thank you!
LikeLike